Koi/Ayu: Difference between revisions
(→koi: Add USB pad description and image) |
(→Getting USB: add image for ayu) |
||
| Line 78: | Line 78: | ||
= Getting USB = | = Getting USB = | ||
USB is | You can find a 3D printable dock to attach pogo-pins onto the hidden USB pads at https://www.thingiverse.com/thing:6189366 | ||
The procedure to reveal those USB Pads is described below. | |||
== ayu == | == ayu == | ||
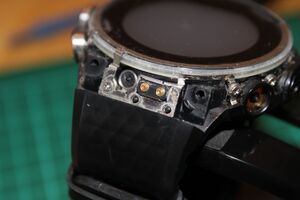
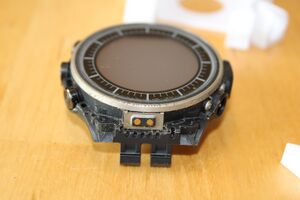
[[File:Ayu-medaka-usb-pads.jpg|alt=USB pads on ayu|thumb|USB pads on ayu]] | |||
USB is not exposed on the outside of these watches. Accessing USB requires some disassembly of the watch, but does not compromise water resistance. | USB is not exposed on the outside of these watches. Accessing USB requires some disassembly of the watch, but does not compromise water resistance. | ||
The process is as follows: | The process is as follows: | ||
| Line 103: | Line 106: | ||
* Modify the Casio logo plate. | * Modify the Casio logo plate. | ||
*; This will allow you to access USB by only removing the top strap of your watch. This avoids the issue of the other two methods, but does involve some knife skills. TODO: Add pictures | *; This will allow you to access USB by only removing the top strap of your watch. This avoids the issue of the other two methods, but does involve some knife skills. TODO: Add pictures | ||
== koi == | == koi == | ||
[[File:Koi USB pads.jpg|alt=USB pad location on koi|thumb|USB pad location on koi]] | [[File:Koi USB pads.jpg|alt=USB pad location on koi|thumb|USB pad location on koi]] | ||
| Line 109: | Line 112: | ||
* Display Top Frame needs to be removed and can not be put back during making USB connection | * Display Top Frame needs to be removed and can not be put back during making USB connection | ||
* The USB pads are on a sightly different position than on ayu and medaka | * The USB pads are on a sightly different position closer to the center than on ayu and medaka | ||
Revision as of 14:16, 29 September 2023
Koi (Casio Smart Outdoor Watch WSD-F10) and Ayu (Casio Pro Trek Smart WSD-F20) are a pair of humongous watches with secondary, sunlight readable displays. The WSD-F20 has GPS while the WSD-F10 does not. The ports are experimental because of bricking issues.
WARNING: RISK OF BRICKING! READ BELOW
This is not the Casio WSD-F21HR. That is a different watch, see medaka.
Description
Koi is Casio's first WearOS watch. It is huge. The WSD-F10 was the first watch to introduce a dual-layer display, which was then made popular by catfish. Ayu is the successor to koi and added GPS. Both watches have flat tyres at the bottom of their round displays, as well as charging indicator lights next to their magnetic charging connectors. While koi and ayu's straps mount in the same way, their different shape means that koi and ayu's straps aren't intercompatible. Make sure you buy the correct straps for your watch.
koi
Koi is a large watch with a single piece bezel. The front has labels for the 'tool' and 'app' buttons and a 'sensor' label next to the pressure sensor port.
ayu
Ayu's main differentiator is the addition of GPS, but the watch is also redesigned to be more in line with Casio's Pro Trek brand. The bezel is covered in text, on top of the text present on koi.
Second Display
The second display has 5 16-segment digits in the center, 4 7-segment digits at the bottom, a battery icon in the bottom left, a 21x7 pixel matrix at the top and two separator lines above and below the central large digits.
Timekeeping
Whenever the colour LCD is not on, the monochrome LCD comes on. This shows Date and day of week in the dot matrix, hours and minutes in the middle and seconds at the bottom. The separator lines are not shown normally.
'Timepiece' mode
It is possible to power off the main system while the secondary LCD continues to show the time. When in this mode, pressing the power button quickly will cause the backlight to come on for a few seconds. The separator lines are shown when in timepiece mode.
Data display mode
It is also possible to show arbitrary data on the dot matrix and central display. Under casio's software, this could show compass bearing, tide times, sunrise/sunset times, altitude (with altitude graph), air pressure (with air pressure graph) and calories burned.
- When displaying arbitrary data, the bottom section instead shows hours and minutes with a colon separator.
- Apart from the colon, the central display also has an apostrophe after the second digit and after the 3rd digit. The last digit of the central display only shows in arbitrary data mode, and is smaller than the main 4.
- It is possible to write any number to the central 5 16-segment digits, and to show any combination of digits and punctuation.
- It is possible to write up to 4 characters of text to the top dot matrix.
- If text and numbers aren't sufficient, it is possible to write arbitrary graphics to the dot matrix and the central digits.
HARDWARE ISSUES
These watches are expensive and problematic. Buyer Beware!!!
BRICKING ISSUES
Bugs in the original WearOS software can cause these watches to brick themselves. While they seem to be quite stable under AsteroidOS, it seems that messing with the bootloader and continuing to use WearOS can cause the watches to corrupt their own bootloader and bootloop forever. Our only advice is to flash with extreme caution and chat on matrix before doing so.
WearOS activation bug
Other bugs in WearOS can cause the watch to get stuck at the WearOS activation screen after a factory reset. If this happens to your device, you can still flash AsteroidOS and it should work fine.
Display delamination issues
If you see a strange fuzzy or cracked look around the flat tyre, that is the display delaminating. This will cause the touch digitiser to fail. The watch is still usable, but you won't be able to tap the entire screen. Don't buy any watch where you can see this happening.
Getting USB
You can find a 3D printable dock to attach pogo-pins onto the hidden USB pads at https://www.thingiverse.com/thing:6189366
The procedure to reveal those USB Pads is described below.
ayu
USB is not exposed on the outside of these watches. Accessing USB requires some disassembly of the watch, but does not compromise water resistance. The process is as follows:
- Optionally remove the straps. This isn't necessary, but gives you more space to work.
- To remove the straps:
- Find the metal strap retention brackets at the base of the straps. Find the springbar pin which engages with the bracket.
- On one side of the bracket, use something thin to push in the springbar and pull that side of the bracket away.
- Use a pair of tweezers to remove the spring bar
- Hinge the strap outwards until you can remove it completely.
- Remove the four hex screws from the front of the watch. Be gentle, as these screws thread into plastic.
- Pop the outer bezel off. It helps to use a plastic pick wedged in the corner next to the strap.
- Beware, as the inner bezel will also release, and the charging indicator light pipe may fall out. The light pipe is tiny and transparent, don't lose it!
- It is possible to pop the bezel off only at the top, but this is more fiddly and more difficult.
- Remove the 'Casio' logo plate by just pulling it off the watch.
USB is presented as two gold-plated pads. Do not attempt to solder to these pads, you will melt the casing of your watch. You should build some sort of dock to interface with these pads. It is recommended to use pogo pins for this. A 3D printable dock with specified pogo pins is available here: https://www.thingiverse.com/thing:6189366
You now have three options:
- Reassemble the watch completely.
- This means USB will require disassembly to access. If not done carefully, this may wear out the holes that the front hex screws go into.
- Reassemble omitting the Casio logo plate.
- This will leave a hole in the front of your watch through which you can access the USB pads - this won't compromise water resistance, but may look ugly.
- Modify the Casio logo plate.
- This will allow you to access USB by only removing the top strap of your watch. This avoids the issue of the other two methods, but does involve some knife skills. TODO
- Add pictures
koi
The USB access procedure is similar to ayu with following differences:
- Display Top Frame needs to be removed and can not be put back during making USB connection
- The USB pads are on a sightly different position closer to the center than on ayu and medaka
Repair
The watches can be easily disassembled by removing 6 phillips screws on the back. The watch is sealed with a gasket, so water resistance is not compromised by disassembly. Replacement parts are available, but expensive.
Miscellaneous hardware docs
Keys
The central key is the power button. The top and bottom keys are volume up and down respectively.
Manually getting to fastboot
Hold the top key while powering on the watch. Navigate the menu using the top key and select using the power button.

